Webinterface: Difference between revisions
| (24 intermediate revisions by the same user not shown) | |||
| Line 1: | Line 1: | ||
{{#seo: | {{#seo: | ||
|title= | |title=Manage your products in the CKRAS Customer Panel | ||
|title_mode=append | |title_mode=append | ||
|keywords=ckras, wiki, cs2, gameserver, help, guide, csgo, webinterface, token, gslt, area, wiki, help, payments, voiceserver, teamspeak | |keywords=ckras, wiki, cs2, gameserver, help, guide, csgo, webinterface, token, gslt, area, wiki, help, payments, voiceserver, teamspeak | ||
|description=WIKI for our CKRAS | |description=WIKI for our CKRAS Customer webinterface, here you will be briefly shown how to manage your products. | ||
|image= | |image=Webinterface-ckras.png | ||
|image_alt=CKRAS | |image_alt=CKRAS Customer Panel | ||
}} | }} | ||
[[File:Dashboard.png|left|20x20px|WEBPANEL|link=]] | [[File:Dashboard.png|left|20x20px|WEBPANEL|link=]] | ||
The [[CKRAS]] Webinterface is a proprietary development and is constantly expanding in functionalty. The [[CKRAS]] Webinterface is virutalized in the [[Cloud]] and can be operated from anywhere (Responsive-Design), while we mainly rely a great emphasis on usability and simplicity. We provide all our customers with a few clicks, for example the possibility a [[Gameserver]], including all comman maps, configs, to start plugins for the league play. The latest innovation is our [[CKRAS]] [[GamingCloud]]<br> | The [[CKRAS]] Webinterface is a proprietary development and is constantly expanding in functionalty. The [[CKRAS]] Webinterface is virutalized in the [[Cloud]] and can be operated from anywhere (Responsive-Design), while we mainly rely a great emphasis on usability and simplicity. We provide all our customers with a few clicks, for example the possibility a [[Gameserver]], including all comman maps, configs, to start plugins for the league play. The latest innovation is our [[CKRAS]] [[GamingCloud]]<br> | ||
| Line 15: | Line 12: | ||
'''Information''' | '''Information''' | ||
{| style="max-width: 680px;" | {| style="max-width: 680px; border-collapse: separate; border-spacing: 20px;" | ||
|- | |- | ||
| style="width: | | style="width: 225px; height: 85px; text-align: center; background-color: #CDCDCD;" | [[Gameserver]] | ||
| style="width: | | style="width: 225px; height: 85px; text-align: center; background-color: #CDCDCD;" | [[Voiceserver]] | ||
| style="width: 225px; height: 85px; text-align: center; background-color: #CDCDCD;" | [[Testserver]] | |||
| style="width: | |||
|- | |- | ||
| | | style="width: 225px; height: 85px; text-align: center; background-color: #CDCDCD;" | [[Updates]] | ||
| | | style="width: 225px; height: 85px; text-align: center; background-color: #CDCDCD;" | [[Rebate System|Discount]] | ||
| style="width: 225px; height: 85px; text-align: center; background-color: #CDCDCD;" | [[Special]] | |||
|- | |- | ||
| style="width: | | style="width: 225px; height: 85px; text-align: center; background-color: #CDCDCD;" | [[Technicial Data|Technic]] | ||
| style="width: 225px; height: 85px; text-align: center; background-color: #CDCDCD;" | [[MatchZy]] | |||
| style="width: 225px; height: 85px; text-align: center; background-color: #CDCDCD;" | [[CS2]] | |||
| style="width: | |||
| style="width: | |||
|- | |- | ||
| style="width: 225px; height: 85px; text-align: center; background-color: #CDCDCD;" | [[Workshop]] | |||
| style="width: 225px; height: 85px; text-align: center; background-color: #CDCDCD;" | [[Teamspeak]] | |||
| style="width: 225px; height: 85px; text-align: center; background-color: #CDCDCD;" | [[Payment Methods|Payment]] | |||
| style="width: | |||
| style="width: | |||
| style="width: | |||
|} | |} | ||
| Line 69: | Line 46: | ||
=== Gameserver Installation === | === Gameserver Installation === | ||
[[File:1.png|left|20x20px]]Step 1 - Click here to install a [[Gameserver]] | [[File:1.png|left|20x20px]]Step 1 - Click here to install a [[Gameserver]] | ||
[[ | [[File:Server-install-1.png|750x750px]]<br> | ||
<br> | |||
=== Gameserver Game Selection === | === Gameserver Game Selection === | ||
[[File:2.png|left|20x20px]]Step 2 - Please select your prefered Game | [[File:2.png|left|20x20px]]Step 2 - Please select your prefered Game | ||
| Line 99: | Line 75: | ||
== Guide == | == Guide == | ||
Logging into the | Logging into the [https://iface.ckras.com webpanel] is relatively simple [[File:Happiness.png|20x20px]]. On the login page, please use your customer number or email address with the password you created when ordering and click on Login. Alternatively, you can also log in with your Steam login details if you have entered them once under "Personal data" (enter [[Webinterface#Steam Login|Steam login]]). | ||
If you forget your password, you can simply request a new one with ‘Forgot password’, see here: [[Reset password]] [[File:Hide.png|20x20px]] | If you forget your password, you can simply request a new one with ‘Forgot password’, see here: [[Reset password]] [[File:Hide.png|20x20px|link=Reset password]] | ||
[[File:Login-panel.png|750x750px]] | [[File:Login-panel.png|750x750px]] | ||
| Line 120: | Line 96: | ||
[[File:Link-with-steam-3.png|alt=Steam Login|656x656px]] | [[File:Link-with-steam-3.png|alt=Steam Login|656x656px]] | ||
<u>Note:</u> Only the Steam account linked under Personal data can also view invoices, this is one of the main differences to the feature [[Webinterface#Sub-User|'''sub-user''']], which is intended for team members, friends, etc. | |||
== Manage your Gameserver == | == Manage your Gameserver == | ||
We have already briefly shown you how to install your [[gameserver]] in the first steps, see here: | We have already briefly shown you how to install your [[gameserver]] in the first steps, [[Webinterface#Gameserver Installation|see here]]: | ||
Here I will show you briefly how to install or update plugins, how to find the FTP data, console logs or how to edit the server.cfg manually in the webpanel. | Here I will show you briefly how to install or update plugins, how to find the [[Webinterface#FTP-Settings|FTP data]], console logs or how to edit the [[Webinterface#Server.cfg edit (Advanced Settings)|server.cfg]] manually in the webpanel. | ||
=== Custom Maps | === Install Custom Maps === | ||
In the new development of the | In the new development of the webinterface, we have dispensed with pre-installed custom maps for [[CS2]], as the simplest installation can be carried out via [[Workshop]]. We therefore recommend that you take a look at this [[Workshop|workshop guide]] for custom maps. | ||
=== Gamemode selection (example CS2) === | === Gamemode selection (example CS2) === | ||
| Line 149: | Line 127: | ||
=== Server.cfg edit (Advanced Settings) === | === Server.cfg edit (Advanced Settings) === | ||
You can edit the most important points such as password, server name or RCON password in the quick menu. For all those who want to continue to edit the Server.cfg completely themselves, we have now stored these settings under ‘Advanced Settings’, where you can edit the server settings manually as usual. | You can edit the most important points such as password, server name or RCON password in the [[Webinterface#Configure Game|quick menu]]. For all those who want to continue to edit the Server.cfg completely themselves, we have now stored these settings under ‘Advanced Settings’, where you can edit the server settings manually as usual. | ||
[[File:Servercfg-settings.png|alt=Server.cfg|750x750px]] | [[File:Servercfg-settings.png|alt=Server.cfg|750x750px]] | ||
| Line 189: | Line 167: | ||
More Information for your [[Mumble]] Server you will find in the special [[Mumble]]-WIKI Section. Mumble is not longer availible at CKRAS<br> | More Information for your [[Mumble]] Server you will find in the special [[Mumble]]-WIKI Section. Mumble is not longer availible at CKRAS<br> | ||
[[file:mumble_webinterface.png|mini|450px|left|alt=Mumble]]<br><br><br><br><br><br><br><br><br><br><br> | [[file:mumble_webinterface.png|mini|450px|left|alt=Mumble]]<br><br><br><br><br><br><br><br><br><br><br> | ||
== Sub-User == | |||
You can add additional users in the CKRAS panel who are only allowed to manage a [[Gameserver]] or [[Teamspeak]] server, for example, but they do not have access to your personal data or invoices, for example. | |||
{{info|You can assign admins individually per server}} <br> | |||
To add a sub-user as an admin, simply check the "Admin" box and the user will be able to manage the server in the future. | |||
[[File:Sub-user-add.png|alt=Sub-User add|750x750px]] | |||
== Subscriptions == | |||
You can easily manage your subscriptions in the webinterface, and we'll show you how to [[Cancellation|cancel or reactivate]] them [[Cancellation|here]]. | |||
== Invoices == | |||
As the main user, you can view your invoices in the ‘Invoices’ category at any time, view open items and also start the payment process directly from the panel. | |||
== How to manage the CKRAS Cloud == | == How to manage the CKRAS Cloud == | ||
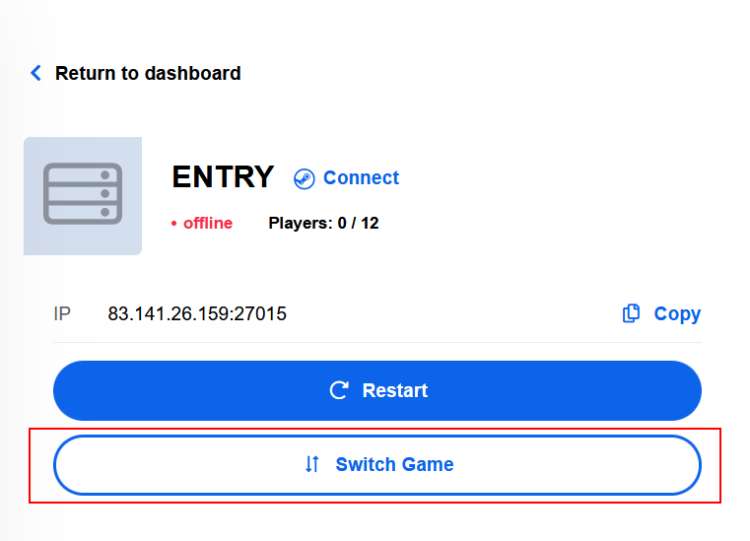
The CKRAS Cloud is automatically maintained by us, all games here are regularly updated by us. The available games can be accessed in the web panel under ‘Change game’. | The CKRAS Cloud is automatically maintained by us, all games here are regularly updated by us. The available games can be accessed in the web panel under ‘Change game’. | ||
== How to manage the CKRAS [[Webhosting]] Services == | == How to manage the CKRAS [[Webhosting]] Services == | ||
| Line 201: | Line 197: | ||
== [[Updates]] == | == [[Updates]] == | ||
Updates from [[Gameserver]], [[Voiceserver]], [[Webhosting]], [[Cloud]] and so on would be installed automatically from | Updates from [[Gameserver]], [[Voiceserver]], [[Webhosting]], [[Cloud]] and so on would be installed automatically from CKRAS, more information you´ll find at our [[Updates]] Page. | ||
{| style="max-width: 680px;" | {| style="max-width: 680px;" | ||
| Line 209: | Line 205: | ||
| style="width: 190px; height: 85px; text-align: center; background-color: #E0E5Ee;" | [[Gameserver]] | | style="width: 190px; height: 85px; text-align: center; background-color: #E0E5Ee;" | [[Gameserver]] | ||
| style="width: 20px; height: 75px;" | | | style="width: 20px; height: 75px;" | | ||
| style="width: 190px; height: 85px; text-align: center; background-color: #E0E5Ee;" | [[TV-Server]] | | style="width: 190px; height: 85px; text-align: center; background-color: #E0E5Ee;" | [[TV-Server|TV]] | ||
| style="width: 20px; height: 75px;" | | | style="width: 20px; height: 75px;" | | ||
| style="width: 190px; height: 85px; text-align: center; background-color: #E0E5Ee;" | [[CS2]] | | style="width: 190px; height: 85px; text-align: center; background-color: #E0E5Ee;" | [[CS2]] | ||
Latest revision as of 09:46, 7 June 2024
The CKRAS Webinterface is a proprietary development and is constantly expanding in functionalty. The CKRAS Webinterface is virutalized in the Cloud and can be operated from anywhere (Responsive-Design), while we mainly rely a great emphasis on usability and simplicity. We provide all our customers with a few clicks, for example the possibility a Gameserver, including all comman maps, configs, to start plugins for the league play. The latest innovation is our CKRAS GamingCloud
Information
| Gameserver | Voiceserver | Testserver |
| Updates | Discount | Special |
| Technic | MatchZy | CS2 |
| Workshop | Teamspeak | Payment |
Features
NEW: CS2 & CS2 Installation Guide
Gameserver administrate, configurate
- Change Counterstrike titles within seconds
- Easy management of server names, RCON or server passwords conveniently in the panel
- Simple upgrade of plugins
- Regular expansion of additional add-ons for CS2
- Full FTP access for customised configuration
- Data protection: We do not track any data, your data is safe with us.
Gameserver Installation
Step 1 - Click here to install a Gameserver

Gameserver Game Selection
Step 2 - Please select your prefered Game

Select Game
Step 3 - Select the game you want here

Install Game
Step 4 - Install the desired game and start it

Configure Game
Step 5 - Configure the game according to your wishes

Voiceserver administrate, configurate
Teamspeak, Ventrilo, Mumble
Invoice Overview, Make a payment
Edit Personal Data
Current News -> https:/
Guide
Logging into the webpanel is relatively simple ![]() . On the login page, please use your customer number or email address with the password you created when ordering and click on Login. Alternatively, you can also log in with your Steam login details if you have entered them once under "Personal data" (enter Steam login).
. On the login page, please use your customer number or email address with the password you created when ordering and click on Login. Alternatively, you can also log in with your Steam login details if you have entered them once under "Personal data" (enter Steam login).
If you forget your password, you can simply request a new one with ‘Forgot password’, see here: Reset password ![]()


Steam Login
In addition to logging in with your customer number/email and password, you can also conveniently connect to your customer interface with Steam, all you have to do is link your account to Steam once under ‘Personal data’.

Here you have to connect your account with Steam once

Successfully connected, you can also connect to your Steam account on your webpanel in the future.

Note: Only the Steam account linked under Personal data can also view invoices, this is one of the main differences to the feature sub-user, which is intended for team members, friends, etc.
Manage your Gameserver
We have already briefly shown you how to install your gameserver in the first steps, see here:
Here I will show you briefly how to install or update plugins, how to find the FTP data, console logs or how to edit the server.cfg manually in the webpanel.
Install Custom Maps
In the new development of the webinterface, we have dispensed with pre-installed custom maps for CS2, as the simplest installation can be carried out via Workshop. We therefore recommend that you take a look at this workshop guide for custom maps.
Gamemode selection (example CS2)
You can easily change the gamemode in the webpanel, simply click on the drop-down menu and select the desired game mode and then ‘restart’ the server to start it.

FTP-Settings
For all those who want to use many plugins for their individual wishes on the gameserver, our full FTP access is one of the most important areas. We at CKRAS do not regulate which addons you upload to your server, the only thing users always have to consider is that we use LINUX as operating system.

Console Logs
The console log is particularly useful if the server does not start and you want to search for what is causing a crash, it also helps when searching for Steam ID and much more.

Config // Server.cfg edit
Server.cfg edit (Advanced Settings)
You can edit the most important points such as password, server name or RCON password in the quick menu. For all those who want to continue to edit the Server.cfg completely themselves, we have now stored these settings under ‘Advanced Settings’, where you can edit the server settings manually as usual.

Plugins
To get you started, we have already integrated some plugins into the webinterface by default, including Metamod, CounterStrikeSharp, MatchZy, PreFire, Retakes, others will be added step by step and the details for configuring each plugin will be explained in the respective wiki section.

Settings
Here is the picture for the default settings for your gameserver, here you can see all the settings that can be made here via server name, password, set RCON password or the start map that can be selected. The most important point for every game server is that the GSLT key is uploaded and if you want to use custom maps you have to add a workshop. If you want to use a TV server, you can simply activate it with a click or edit it in the Server.cfg under Advanced Settings.

Here is another example of how a plugin for which there is an update is displayed. We also install patches automatically if the newer version is absolutely necessary for correct operation due to an incompatibility.

If you have any questions about administration or change requests, please contact us at any time via Discord or Support Ticket.
How to administrate a Voiceserver
Teamspeak
More Information for your Teamspeak Server you will find in the special Teamspeak-Wiki Section.

Mumble
More Information for your Mumble Server you will find in the special Mumble-WIKI Section. Mumble is not longer availible at CKRAS

Sub-User
You can add additional users in the CKRAS panel who are only allowed to manage a Gameserver or Teamspeak server, for example, but they do not have access to your personal data or invoices, for example.
|
|
You can assign admins individually per server |
To add a sub-user as an admin, simply check the "Admin" box and the user will be able to manage the server in the future.

Subscriptions
You can easily manage your subscriptions in the webinterface, and we'll show you how to cancel or reactivate them here.
Invoices
As the main user, you can view your invoices in the ‘Invoices’ category at any time, view open items and also start the payment process directly from the panel.
How to manage the CKRAS Cloud
The CKRAS Cloud is automatically maintained by us, all games here are regularly updated by us. The available games can be accessed in the web panel under ‘Change game’.
How to manage the CKRAS Webhosting Services
Our Webhosting-Packages would be managed with the Software from LiveConfig. We do not accept new Webhosting Customers from 02/2021


Updates
Updates from Gameserver, Voiceserver, Webhosting, Cloud and so on would be installed automatically from CKRAS, more information you´ll find at our Updates Page.
| Teamspeak | Gameserver | TV | CS2 | ||||
YourIP
For some Reasons (for example: Routing Issues) we need your IPv4 or IPv6 Adress, for this case we created a Page where you easily copy&paste your IP Data, please visit: https://www.ckras.com/en/yourip and sent us your Traceroute.